Inbound receiving
Everything you need to ship product to our warehouse.
Receiving guidelines
These receiving guidelines are in place so our warehouse teams can process your products quickly and start shipping for you. We appreciate your cooperation in helping us to keep operations running smoothly.
We want to make sure that we are able to keep all of your inventory accurate and get your orders shipping as fast as possible! In order to do this, we need your help following these guidelines and steps below.
Step 1. Make sure your suppliers or you are sending us the inventory how we need to receive it. You’ll see the guidelines for receiving below on this article. Please share this with your suppliers if needed! This ensures accuracy and speed for receiving. It will also mitigate any extra costs on receiving for us to fix any discrepancies or errors.
Step 2. Fill out the Receipt Order within our system.
Step 3. You or your Supplier need to schedule at least 24hrs prior to delivery when the delivery will arrive to us. This allows for us to plan the best in order to receive your products correctly and timely.
Any shipment that arrives outside of these guidelines will incur a Special Request Hourly Rate and any supply costs involved to fix the shipment.
- Schedule an appointment by sending an email to our receiving team receiving@deliverzen.com . All appointment scheduling Request must be sent at least 24 hours prior to the shipment arriving out a Deliverzen warehouse.
- The Shipment info below is required upon appointment request (24 hrs prior to delivery):
- PO/ASN/shipment. Please make sure the PO/ASN/Shipment matches the Receipt Order Number # in ShipHero.
- Lot # if available. Products with expired Lot # on the shipment will be put on hold until next steps are clearly communicated between the customer and our receiving team before we receive the products.
- Your company name.
- Is the inventory coming in on Pallets or Cartons?
- Number of pallets, cartons, units, etc.
- We do not accept mixed Cartons. We do accept mixed pallets but there will be additional charges for sorting cartons when we receive the items in.
- Each SKU must be separate in its packing. No mixed SKU cartons. (Ex. Different sizes of the same product must be in individual boxes)
- If utilizing inner cartons, they too must be clearly labeled with the SKU and quantity on the outside.
- Seal # if available
- MSDS Sheets must be provided 1 week ahead of the inventory arriving at the warehouse.
- Our Receiving Operating Hours are: 8:00am-3:00pm CST
- 2-hour delivery window
- We do not accept drops
Notice: We do our best to accommodate inbound deliveries. That being said, sometimes accidents happen and a delivery will miss the scheduled time or be late. If a delivery is missed or arrives late, we may have to deny the delivery. In this case, please reschedule the inbound for another time.
Load and pallet requirements
- 48L”x 40W”x 55H” pallet max
- Safety and racking requirements
- Grade A wood pallets
- Grade B requires restacking
- No plastic pallets
- Racking compliance requirements
- Mixed pallet and carton labels clearly defined
- Labels facing out
- Minimal pallet overhang allowed
- Packing list requirements
- PO, QTY, SKUs and LOT details MUST be provided for accuracy
- If multiple POs, there needs to be separate packing lists for each PO.
- If there are multiple trucks or containers, each truck or container must also have its own packing list.
- Overweight pallets need dunnage at base level
- Pallet wrapped at least 3 times to the pallet and covering all 5 sides
- Hazmat requirements
- Placarding
- MSDS Sheets must be provided 1 week ahead of the inventory arriving at the warehouse.
- New SKUs require item master updated at least 1 week before arrival.
- Boxes need structural integrity
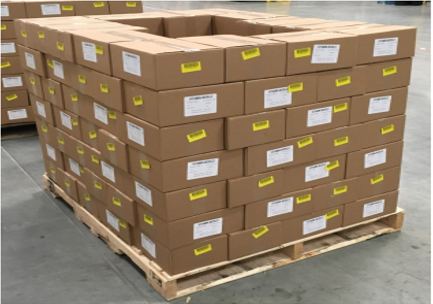
- See the example pic below.
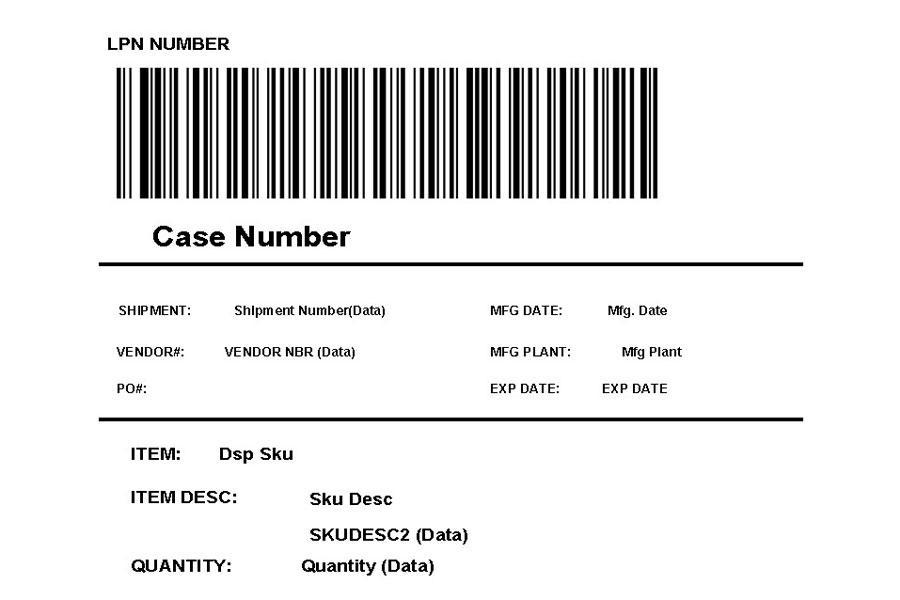
Case label Information
- Outer carton MUST have reference number (Your company name, UPC, SKU, quantity within the carton, Item with scannable barcode)
- Case/UPC Barcode expectations
- Type: Most GS1 barcode formats accepted
- Preferred: UPC-A, UPC-E, ITF 2 of %, Code 39, Code 128, GTIN, GS1-128
- Color and background Black on white, scanning issues may occur otherwise
- Separated barcode components:
- UPC, SKU, Quantity, and LOT/Expiration date (where applicable are separate barcodes and human readable
- See the Example below:
How to send product to Deliverzen
Deliverzen require a shipping plan (or purchase order) to be submitted before products are sent and received at their warehouse. This article will walk you through the steps to create a shipping plan via the 3PL Portal.
How to create a shipping plan
There are two ways to start your Shipping Plan in our Portal:
- Upload a box manifest to import your SKUs and quantities via CSV file.
- Create a shipping plan to manually select your SKUs and quantities.

In this article, we cover how to manually create your shipping plans within the Portal based on the size of your shipment (Small Parcel vs. Freight/LTL) and how you plan to send them to your 3PL's facilities for processing.
How to create a shipping plan for small (parcel) shipments
Creating a shipping plan for a small parcel shipment
- Select Deliverzen location where you are sending your products to.
- Add the products and total quantities included in this shipment.
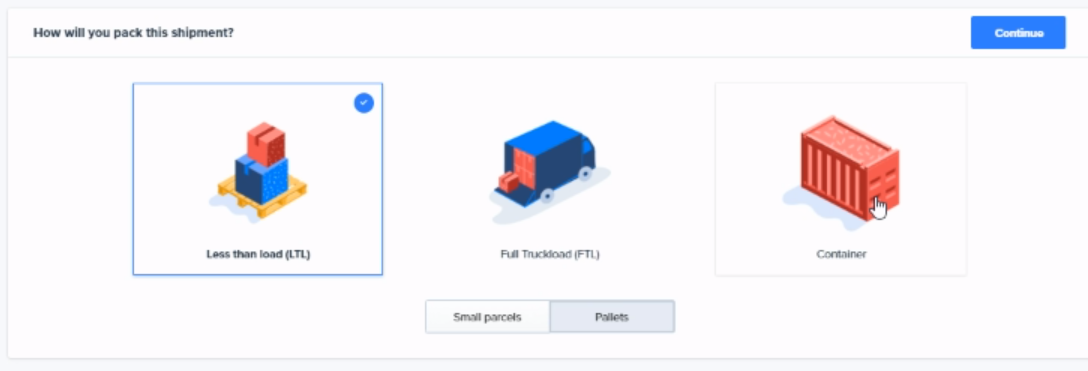
- Indicate how the products will be packed. Select Small Parcel and decide on one of the options below.
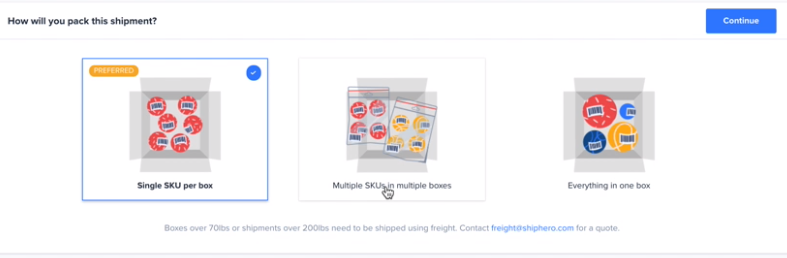
- Specify which products will be in each box; SKU and quantity. In this step, you can also print product barcodes as needed.
- If applicable, add a note for the warehouse or vendor order number.
- Print the packing slips and shipping labels, and apply them to the shipment.
- Send Deliverzen your goods!
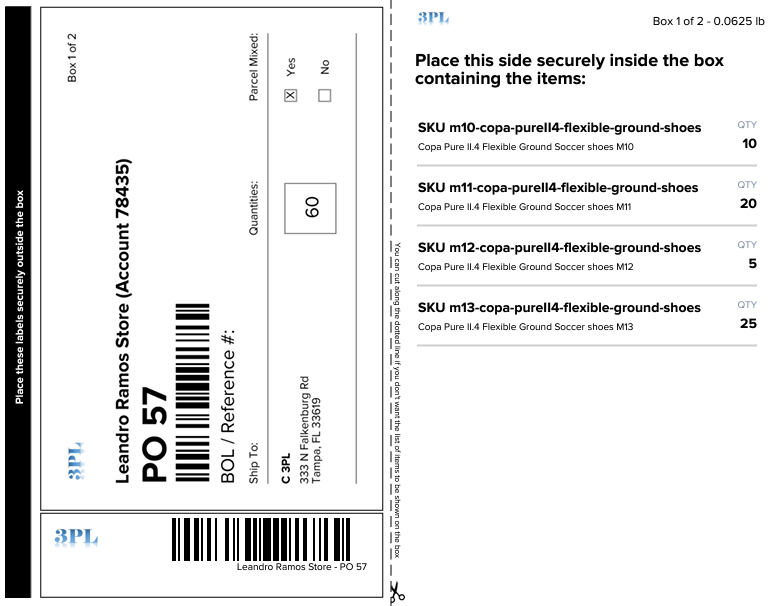
Parcel shipping plan labels
The layout for Parcel Shipping Plan labels, automatically configures the required labels based on the Shipping Plan’s packing setup by adding the total quantity of items within each box and marking them as Parcel Mixed when in a multiple box configuration, helping to streamline the receiving process at the warehouse.
It also prints two barcodes, allowing you to place them on opposite faces of the box. This helps to improve the scanning efficiency at the warehouse when boxes are in piles.
Download parcel shipping plan labels
You can download the Parcel Shipping Plan labels once you complete creating the shipping plan or box manifest.
- Open the Shipping Plan just created.
- If Shipping Plan’s status is still “Processing”, please wait until it changes (labels are being generated)
- Click on the Print icon next to the “Shipping plan details” title at the right of the screen
- Place the corresponding packing slip inside each box
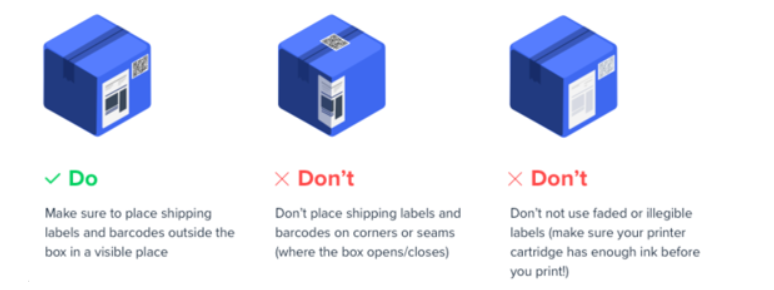
- Make sure to place shipping labels and barcodes outside of each box in a visible place
NOTE: There is a limitation of not more than 200 boxes on a single Parcel Shipping Plan. If more than 200 boxes are required to be sent to the warehouse, it will be need to be split into multiple Shipping Plans.
How to create a shipping plan for large shipments
NOTE: Large shipments include LTL, FTL, Containers, and Palletized Goods.
What does the Portal consider a larger shipment?
Larger shipments include LTL (Less than load), FTL (full truckload), containers, and palletized shipments. Please review with us our freight guidelines before shipping your goods.
Creating a shipping plan for large shipments. (LTL, FTL, containers, and palletized goods)
- Choose Deliverzen fulfillment center you're shipping your products to.
- Add the products and total quantities included in this shipment.
- Tell us how the products will be packed. Select Pallets and decide on one of the options below.
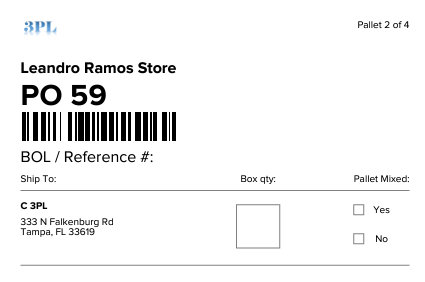
- Create pallet tags for your shipment. Please indicate how many pallets you are sending and if they are floor-loaded.
- Print your pallet tags and apply them to the outside of your pallets so they are visible for our teams to process.
Pallet shipping plan labels
You can download the Pallet Shipping Plan labels once you complete creating the shipping plan or box manifest.
- Open the Shipping Plan just created.
- If Shipping Plan’s status is still “Processing”, please wait until it changes (labels are being generated)
- Click on the Print icon next to the “Shipping plan details” title at the right of the screen
- Make sure to place shipping labels outside of each box in a visible place.
Important notes:
- All shipping plans must include box labels, packing slips, and pallet tags to identify what is inside each shipment you're sending. You can print these during the final steps of creating your shipping plan. Below are some Dos and Don'ts of how these should be applied to your shipments.